RSS

Category Archives: Plumbing

A Final Look at House Infrastructure – First Floor

At the front of the house, there’s a gang of switches, and the electricians had to demo the plaster in this area to run the new wires. All of the casing around the doors and windows has been removed, as well . . .

Our powder room wall is more infrastructure pipes and wires than it is framing . . .

To the south of the powder room, the pantry walls house plumbing and electrical, including bundles of electrical wires running up the end of the new wall from the electrical panel below to supply the second floor.

Rough-ins for the south end of the kitchen:

And electrical, gas, and the hood vent to support elements on the west wall of the kitchen:

The kitchen walls also house hydronic infrastructure elements. Here, the red, radiator supply and return lines for the master bedroom travel up the kitchen bump-out wall:

You can see a 360-degree view of the first floor (in the gloom resulting from boarded-up front windows) at:

http://youtu.be/qqFarZgN1UU

As with the second-floor walkthrough videos, this one does nothing but reinforce the exceedingly geeky interest we have in the renovation details. However, it does provide an interesting view of the house infrastructure elements in a different context.

 
2 Comments

Posted by on May 15, 2012 in AC and Hydronics, Electrical, Plumbing


A Final Look at House Infrastructure – Second Floor

The exposed-infrastructure stage of home renovation is drawing rapidly to a close. Insulation and drywalling activities are looming (they’re actually already here, it’s just that our posts are woefully behind), and it’s time to take a final look at the exposed house elements before they’re forever entombed.

On the second floor, there’s a mess of plumbing, electrical, and mechanical elements in the utility closet between the hallway and the master bedroom. The placement of the air handler on the top floor (consistent with the pre-reno house) helps in AC distribution and minimizes the distance between this component and the compressor directly above it on the roof.

The utility closet also will house stacked, front-loading washer and dryer. The blue spot on the floor in the photo above is one end of the emergency drain line that exits directly from the side of the house in case the washer has an issue. Rough-in electrical and plumbing occupy the south wall of the utility closet for the washer and dryer.

The wall between the two upstairs bathrooms house all of the plumbing supply and drain lines and electrical rough-ins. All of the extra wiring supports subsequent pendant lights in the master bath and sconce lights in the guest bath.

The plumbing rough-in for the two bathrooms is identical: supply lines for flow control valves and fixtures for shower heads and hand-held showers and a thermostatic controller that supports both.

Lots of electrical rough-in elements surround the bathroom framing:

In-line fans mounted above the guest room rafters support both bathrooms. Because of the floor-to-ceiling glass doors on the showers, we need to vent moist air, and these remote fans take care of this nicely. The GC wanted to install routine bathroom ceiling fans, but this approach supported both showers and bathrooms, and were super efficient, so we went with this approach, spec’d by our first architect.

A subsequent picture of the fans appears below, after the insulated vent lines have been attached.

Electrical rough-in also had to contend with solid brick exterior walls in much of the house. The result was a collection of new pockets in the brick to accommodate electrical outlets that will poke through the baseboard in the guest room, pictured below, and all over the main floor, the subject of the next post.

You can see a 360-degree view of the south side of the second floor at:

http://youtu.be/_kX8gQRT61Q

And you can see the same for the north side at:

http://youtu.be/Hbyf_XA21IY

Both links are dorky as hell, but highly informative!

 
Leave a comment

Posted by on May 15, 2012 in AC and Hydronics, Electrical, Plumbing


Save the Bay(s)

As seen earlier (https://wolfestreetproject.com/2012/03/04/weve-been-framed/), one of the several dramatic steps to our renovation was our reluctant removal of the original second-floor joists across three quarters of the length of the house. The joists were pocketed directly into the brick exterior walls, and were perfectly sound, and so we really hated to remove them. However, the 1925 joists ran in an east-west orientation (from side to side in the house, rather than front to back). To route house infrastructure elements for our open floor plan design, north-south orientation was needed.

So, most of the old joists needed to go. They were replaced by the north-south oriented 2x10s that were supported by strategically placed glulam beams. The one area not affected by the new framing was the floor under most of the guest room at the front of the house. There’s no plumbing there (although there will by hydronic supply and return pipes supporting a radiator, as you’ll see), and we were able to develop a workaround to route the AC supply vents there (https://wolfestreetproject.com/2012/04/08/we-just-need-to-vent-a-little/). As a result, leaving the original joists in place at the front of the house was a way to conserve costs (one of the precious few, we’ve come to realize).

Mechanical, plumbing supply pipes (copper, not PVC . . .), plumbing drain pipes, and electrical for the second floor all needed to live somewhere, and that somewhere would be the “bays” between the new joists installed during the renovation. This post provides a Cliffs Notes version of installation of the house infrastructure elements by way of the evolving bay landscape seen from below, on the first floor.

The picture below shows the joist bays after framing has been completed, but before any infrastructure elements have been installed. The triple beams and odd framing on the left side is there to support the showers on the second floor.

In the picture below, elements of the mechanical system begin to appear. One of the vents is orphaned in a bay on the far side of the bulkhead.

The vent is now connected to the AC supply line in the bulkhead, and has been joined by PVC drain lines.

In this view of the bays to the south, the mechanical and drain lines have been joined by copper plumbing supply lines. Note the framing to the right – the original beam arrangement had to be removed and reconstructed after the plumber started doing his thing, and they realized it would not allow pipes to be routed properly.

Electrical has now joined the other elements at this stage.

And what’s the electrical for? Among other things, the recessed lighting in this area, which has been installed at the point this picture was taken. The rearrangement of framing under the showers also solved a lighting design issue. With the original framing, we were not able to install lights in the locations called out by the plan. With the new framing, this obstacle was removed, and both plumbing and lighting could be implemented correctly.


Plumbing Supply Lines – The Good, the Bad, and the PVC

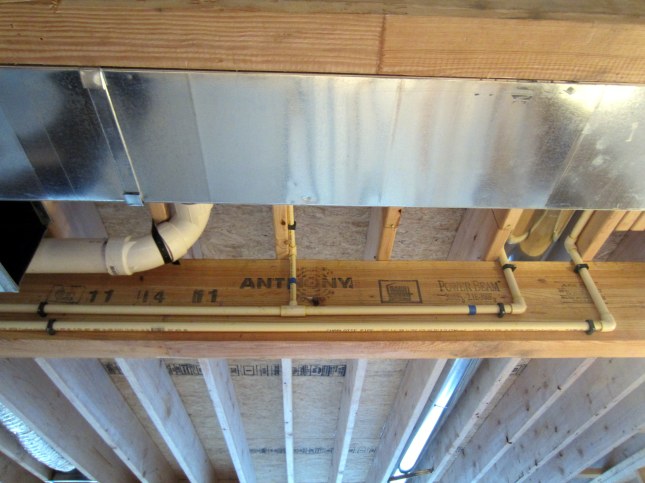
After the larger PVC drain lines were installed, plumbing supply lines started appearing. The problem was, these also were PVC, which caused us some concern. It’s not that PVC (or CPVC for the hot water lines) are bad, necessarily (they meet code requirements), but it wasn’t what we understood would be installed.

We check in on the house and check in with Dave and the guys every day, so we saw the PVC supply lines a day after they began creeping around the house like kudzu climbing an Alabama telephone pole (sorry – I think I’m channeling Ross Perot).

Here’s where these puppies first materialized, snaking across the main floor via the increasingly crowded bulkhead:

This was a puzzlement, inasmuch as we anticipated copper supply lines, like any self-respecting homeowners.

The response by the GC was, gratifyingly, pretty quick.

See ya, PVC:

PVC supply lines out, copper in:

This is either the cold or hot water supply line going to the master and guest baths upstairs:

This was only the start of installation of the pluming supply lines – more on the completed rough-in on this element in a future post.

 
2 Comments

Posted by on April 10, 2012 in Plumbing


Insane in the Main Drain

First, to Cyprus Hill: sorry about the title of the post . . .

After the mechanical went in, the plumbing drain lines were installed. Of the plumbing components, these are the largest, so they needed to be routed after the large AC vents, but before the smaller-diameter plumbing supply lines.

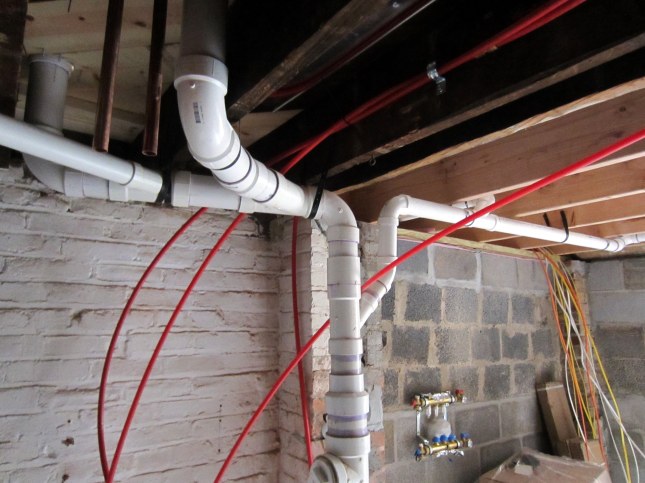
As noted in earlier posts, the 2×6 wall of the powder room serves as a house infrastructure superhighway – there’s going to be a lot going through here. Below is the starting point of drain lines (and associated drain vent lines) being routed from various bays between joists on the second floor, through the bulkhead, down the powder room wall; this culminates in a complex of piping shown at the end of the post:

The powder room itself gets prepped for installation of new fixtures. You can see the hole in the subfloor to the north of the old fixture for old powder room orientation (https://wolfestreetproject.com/2012/03/31/transforming-the-first-floor-goals-and-design-plans/).

Plumbing rough-in begins in the master bath and guest bath. This is a view from the latter, facing south. The two bathrooms will share the drain and supply lines that emerge from the first floor between the shared wall:

A view of the drain line plumbing rough-in from the master bath:

This is the utility closet on the second floor. In addition to the air handler, this area will also house a stacked, front-loading washer and dryer, so drain lines are also needed here:

Below, more progress has been made on both the drain and supply plumbing for the second-floor bathrooms:

Rough-in of plumbing for the wet bar has been complete at this stage (ignore the crazy array of electrical lines to the right – future post, eh).

And, plumbing rough-in for the kitchen sink (this is directly below the south windows on the first floor):

Powder room walls are getting filled up. Lots of stuff routed through this area at this point:

Down in the basement, these drain lines all terminate in a plumbing stack towards the south end of the house:

After the plumbing was completed, the guys tested the system by inflating a service balloon in the clean out port of the plumbing stack (the yellow item below). Our plumber rocks the house. No leaks on the first take (plus, totally elegant routing of both drain and supply lines, as you’ll see in future posts).

 
Leave a comment

Posted by on April 9, 2012 in Plumbing